I was thinking for a while about a nice decorative pillowcase. There are so many patterns to choose from, I couldn’t make up my mind. I was thinking about something a little bit patriotic since the royal baby is going to born soon. Than I saw the little squares on Lucy’s blog. I have to admit, I was a bit discouraged by the amount of sewing and tiding up the lose ends I would have to do, but I wanted to make a Union Jack pillowcase using those little squares. So I came up with a different way to put them together. It’s just requiring little bit less needlework.
Union Jack/denim pillowcase pattern
Finished size: 40cm x 40cm (16”x 16”)
Crochet Union Jack flag: 34cm x 34cm (13,5”x 13,5”)
You need:
I used cca 50 grams of dark red, 50 grams of off white and 50 grams of dark blue cotton
Crochet hook E/3,5mm
Yarn Needle
A pair of jeans size 14 or bigger or guy’s jeans (preferably not stretchy ones).
3 buttons
Terms/Abbreviations: I used US terminology
ch chain
slst slip stitch
sc single crochet
dc double crochet
st stitch
sk skip
This is the chart, which I followed. You start in the top left-hand corner, working horizontally.
First square:
Ch4, slst. to 4th ch from the hook (form the ring), ch3, 2dc’s into the ring, ch3, 3dc’s into the ring, ch3, 3dc’s into the ring, ch3, 3dc’s into the ring, ch3, slst into the 3th ch from the first ch3 group.
Connecting the squares:
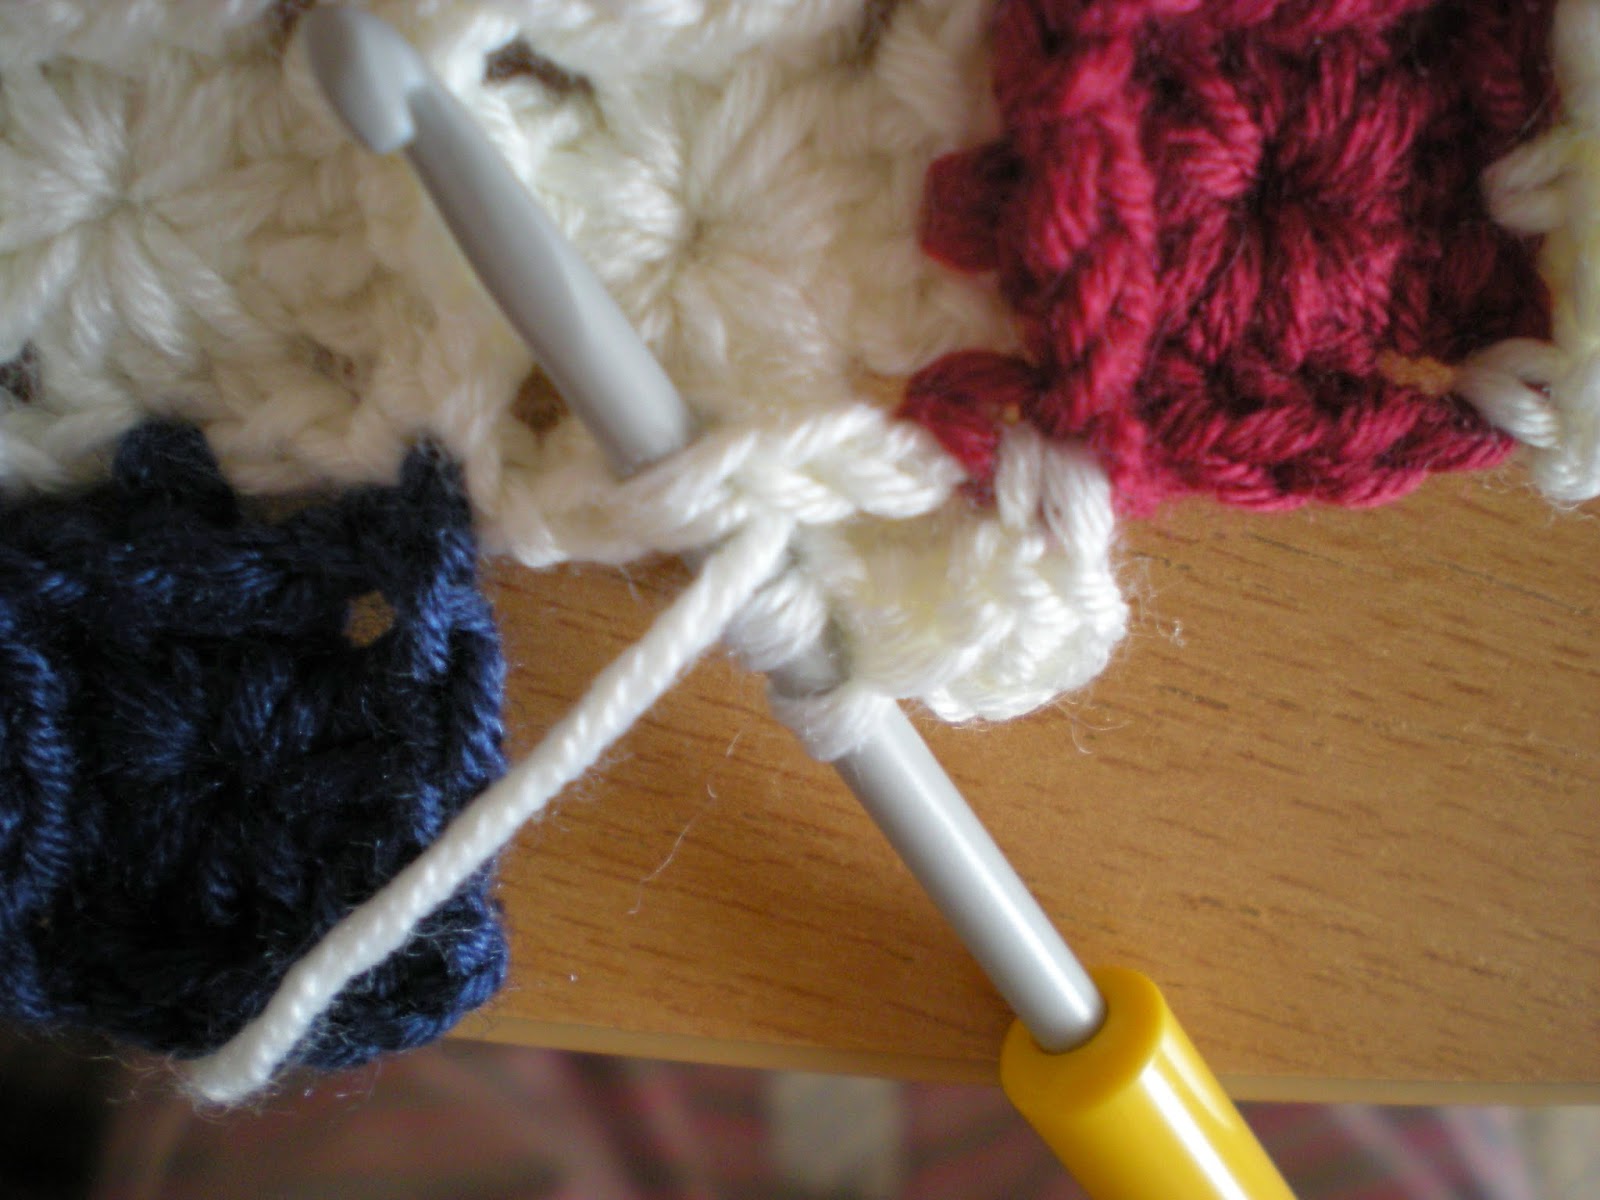
Ch4, slst. to 4th ch from the hook (form the ring), ch3, 2dc’s into the ring,
ch1, sc into the corner of top squares (see picture), ch1,
dc into the ring, start to do second dc into the ring,
right before you finish the second dc insert the hook into middle dc from top square (see picture),
with the cotton on the top, pull through (you have three loops on the hook),
yo and pull through all three loops, third dc into the ring, ch1,
sc into the corner of top and side squares (see picture), ch1,
dc into the ring, start to do second dc into the ring, right before you finish the second dc insert the hook into middle dc from top square (see picture), with the cotton on the top pull through (you have three loops on the hook), yo and pull through all three loops,
third dc into the ring, ch1,
sc into the corner of side squares (see picture), ch1,
3dc’s into the ring, ch3,
slst into the 3rd ch from the first ch3 group. You have to trim the loose ends now, after every finished square. (It’s time consuming, but faster than sewing each square separately.)
All together 196 little squares, measuring all together cca 34cm x 34cm (13,5”x 13,5”).
Steam iron it, just be careful if you are using anything else than cotton.
Jeans/denim pillowcase:
For the actual pillowcase I used pair of jeans I bought after my daughter was born. I had them on couple of times, but I got a bit smaller quite soon. However I kept them in the wardrobe as a reminder of my size. It gave me great pleasure to cut them up and use them for something more useful, plus they were just perfectly suitable for this kind of project.
You can really use any kind of suitable fabric, but I used this old/new pair of jeans, because I hope I won’t ever need this size again.
Cut the jeans so it gives you one/front square measuring 41cm x 41cm (16,5”x 16,5”) or the size you would like your pillowcase to be. If you have to sew the bits of jeans together to get the right size, don’t worry, it won’t be visible much since you will sew the crochet square on it.
Pin the crochet square centrally on a right side of your jeans square and sew it on by sewing machine. Steam iron it again if needed (I did).
The back of the pillowcase looks like this. I cut two pieces of jeans (make sure they are nice pieces) measuring 41cm x 25cm (16,5”x 10”). Sew all parts together wrong side up as you can see on the picture. I put three buttons on back of my pillowcase.
You should end up with interesting, little retro, pillowcase. Don’t be scared, if you are not very good in sewing. Personally, I can sew just straight lines and I did it and I like it a lot. The case is not exactly 3D, but it does have very nice texture.
************************************************
Have nice week
Clara


Great idea Im sure I can adapt this to icelandic flag :) thank you for the tutorial
ReplyDeleteThank you. I'm sure it can be used for nearly all flags.
Deletewonderful work!!!
ReplyDeletelove this!!!
:0)))
http://elianeapkroker.blogspot.com.br/