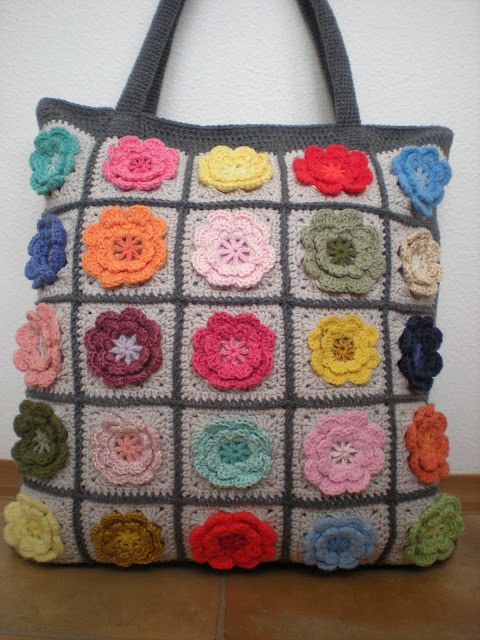
40cm x 38cm (16” x 15”), handle drop cca 55cm (22”)
The size of the bag really depends on type of material and size of the hook you are using, which is up to you.
You need:
I used cca 300 grams of 100% cotton yarn (100g of dark gray, 50g of light gray and 150g of various colors for the flowers)
Crochet hook E/3,5mm for the handles and G/4mm for the bag
Yarn Needle, 35cm (14”) zipper
Terms/Abbreviations: I used US terminology
ch chain
slst slip stitch
sc single crochet
dc double crochet
st stitch
sk skip
Note: Read all the instructions first. I wrote it the way I did it, and I found it the easiest way for me, but you can choose to make the parts of the purse in a slightly different order, whichever suites you better.
Purse body: Front

First you have to make 20 flower squares cca 7,5cm x 7,5cm (3” x 3”). I used a free flower square pattern I found HERE and crochet hook G/4mm. You can use any square shape with or without flowers as long as you like it. It is your choice.
You need to crochet the squares together, I used sc’s.
To secure the rows, and to give the future bag a nice form, I made the border with 2 rows of sc’s all around. Starting at the top right hand corner – sc in sc and 3sc’s in the corners. The first row I crocheted backstitch only. When I finished second row, I added 3 rows of sc’s to the top of the bag, to make it higher. (That’s why is good to start in the top right hand corner. It saves you cutting the yarn). The front is finished.
-I made another bag with the similar front some time ago. You can use it as a guide as well and you will find it here: http://emmhouse21.blogspot.cz/2015/03/soft-flower-purse.html
Purse body: Back
For the back of the purse I used a solid granny square.
Round 1: ch5, slst. to form the circle or you can make magic ring (personally I prefer this). Ch3/2dc into ring – ch3 (thou I crochet ch2 only in each corner– it depends on how stretchy the material is you are using), 3dc’s – ch3 – 3dc’s – ch3 – 3dc’s – ch3, slst. to finish the round.
Round 2: ch3, dc in next two dc’s from previous round, 2dc’s-ch3-2dc’s in the ch3 corner from previous round, dc in next 3 dc’s from previous round, 2dc’s-ch3-2dc’s in the ch3 corner from previous round, dc in next 3 dc’s from previous round, 2dc’s-ch3-2dc’s in the ch3 corner from previous round, dc in next 3 dc’s from previous round, 2dc’s-ch3-2dc’s in the ch3 corner from previous round, slst. into 3rd ch from first ch3 of this round.
And continue the same way. I made 22 rounds. You may need to do a round less or a round more. I continued the same way as with the front - 2 rows of sc’s all around. Starting at the top right hand corner – sc in sc and 3sc’s in the corners. When I finished second row, I added 3 rows of sc’s to the top of the bag. The back is now also finished.
Now it’s the time to sew the front and back together. I crocheted three sides of the back and front together using sc’s from wrong side of the bag.
Lining:
I this stage I would put a lining in the bag. I sewed it in by hand, to the second last round of the bag’s body as shown on the picture. I suppose, you can sew the lining in by sewing machine. I just don’t know how visible it’ll be on outside.
Handle:
This time I ch12, slst. to form the circle (be careful not to twist the chains). I worked in rounds, I didn’t even use a marker, just work sc in first 12 chains and sc in every sc after, keep going around until you have length of 60cm (24”). Sew the handle on the bag through the lining to make it stronger. (See the picture bellow).
The other handle is worked same way.
Zipper:
I’m adding zippers to most of my bags. You can find two options on how to add the zipper in these two free links bellow:
All finished. If you come up with any problems or difficulties, write to me, and I’ll be more than happy to help.
Have a nice week
Clara


No comments:
Post a Comment