Translate

Showing posts with label Pillows. Show all posts

Thursday, January 25, 2018

Pineapple square motive – full written pattern, chart

Hello,
Today I would like to share with you a pattern for an unusual pineapple square motive. The square has got a very multi-purpose use. I’m definitely going to use it to make some kind of top in future.
The motive can be part of a blanket, or any kind of top, even a purse. You can use any type of material you desire, and will suite your purposes. The size of the final square depends very much on the size of hook you will use.
I suggest to you, to make one square as a sample and take measurements before you are going to start any future project.

There are pictures to help guide you through the crocheting, and supporting the written pattern for this square motive. I have added a chart as well. It may even be helpful with learning to read the charts.
I’m also confident that this written pattern is suitable for a dedicated beginner as well.

I am providing the pattern for this motive for a very symbolic price only, and you can find it here:


or here:


Have a nice week
Clara

Sunday, April 19, 2015

Feeling Patriotic

Hello,
I was thinking for a while about a nice decorative pillowcase. There are so many patterns to choose from, I couldn’t make up my mind. I was thinking about something a little bit patriotic since the royal baby is going to born soon. Than I saw the little squares on Lucy’s blog. I have to admit, I was a bit discouraged by the amount of sewing and tiding up the lose ends I would have to do, but I wanted to make a Union Jack pillowcase using those little squares. So I came up with a different way to put them together. It’s just requiring little bit less needlework.


Union Jack/denim pillowcase pattern

Finished size: 40cm x 40cm (16”x 16”)
Crochet Union Jack flag: 34cm x 34cm (13,5”x 13,5”)

You need: 
I used cca 50 grams of dark red, 50 grams of off white and 50 grams of dark blue cotton
Crochet hook E/3,5mm
Yarn Needle 
A pair of jeans size 14 or bigger or guy’s jeans (preferably not stretchy ones). 
3 buttons

Terms/Abbreviations: I used US terminology
ch       chain 
slst      slip stitch
sc       single crochet
dc       double crochet 
st        stitch 
sk       skip

This is the chart, which I followed. You start in the top left-hand corner, working horizontally.

First square:
Ch4, slst. to 4th ch from the hook (form the ring), ch3, 2dc’s into the ring, ch3, 3dc’s into the ring, ch3, 3dc’s into the ring, ch3, 3dc’s into the ring, ch3, slst into the 3th ch from the first ch3 group.

Connecting the squares:


Ch4, slst. to 4th ch from the hook (form the ring), ch3, 2dc’s into the ring,


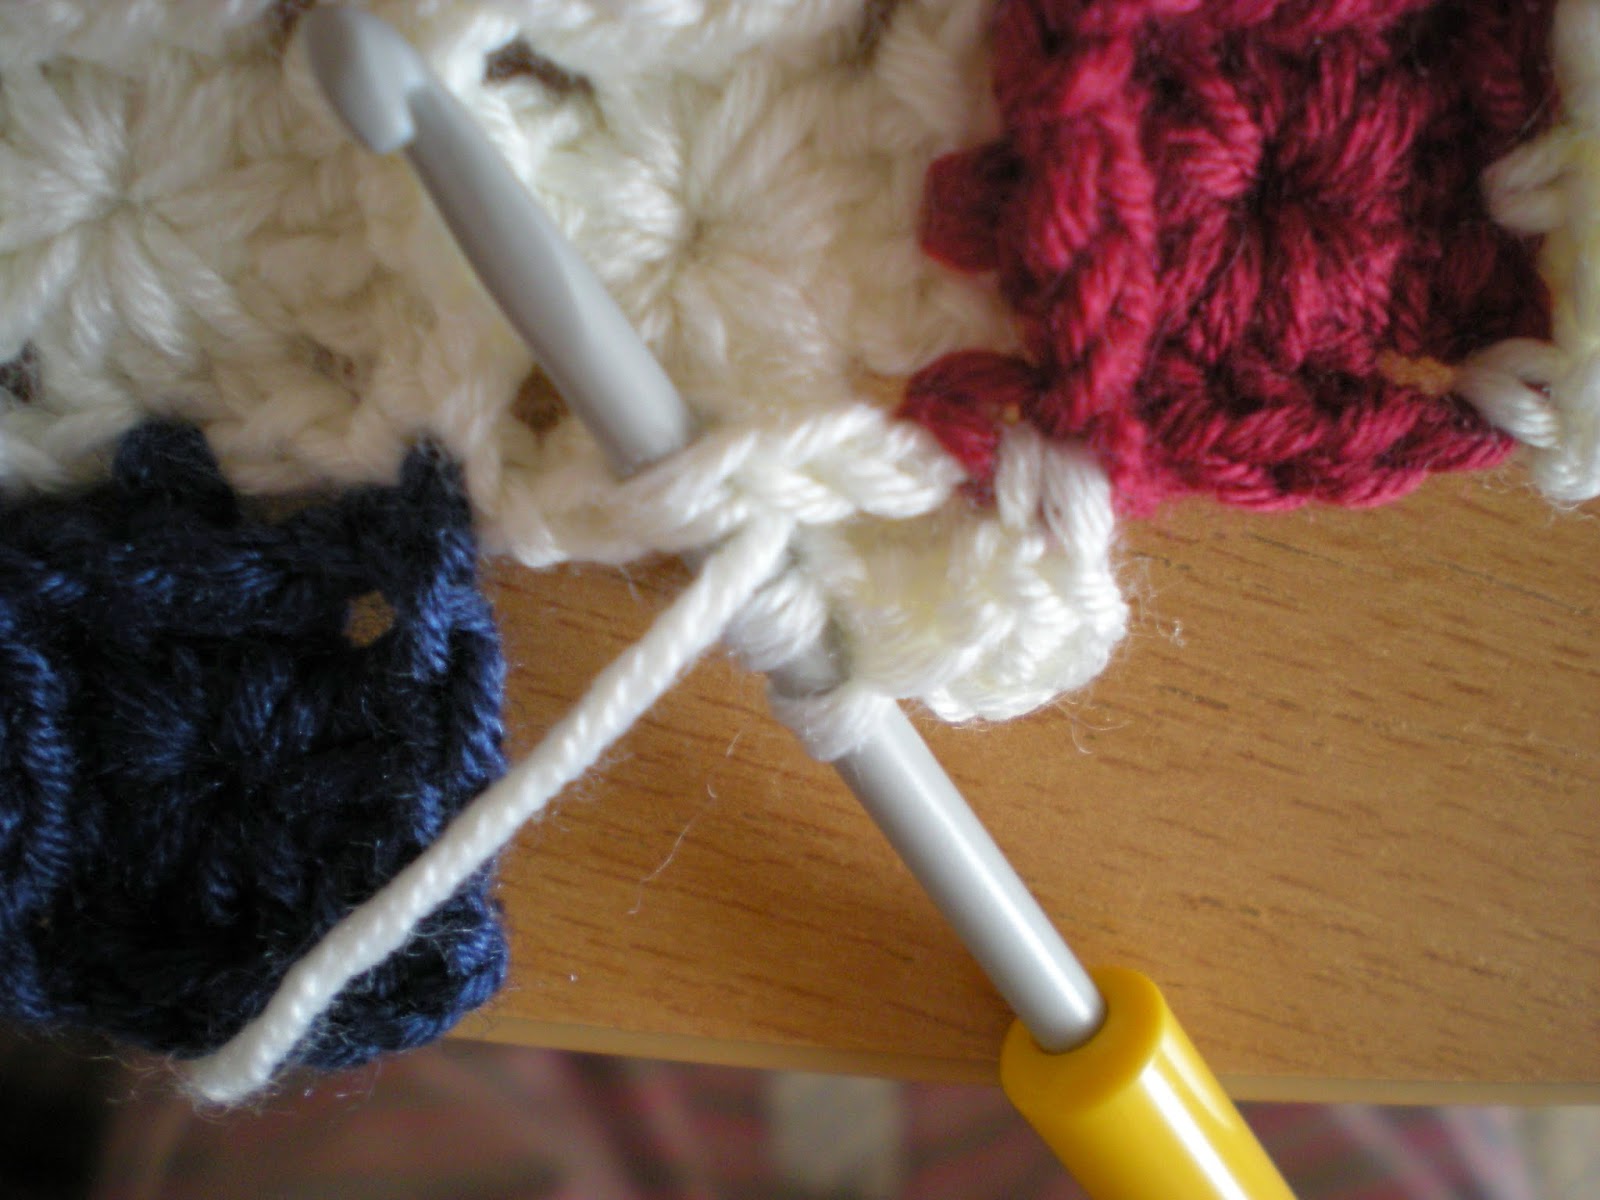
ch1, sc into the corner of top squares (see picture), ch1,


dc into the ring, start to do second dc into the ring,


right before you finish the second dc insert the hook into middle dc from top square (see picture),


with the cotton on the top, pull through (you have three loops on the hook),


yo and pull through all three loops, third dc into the ring, ch1,


sc into the corner of top and side squares (see picture), ch1,


dc into the ring, start to do second dc into the ring, right before you finish the second dc insert the hook into middle dc from top square (see picture), with the cotton on the top pull through (you have three loops on the hook), yo and pull through all three loops, 


third dc into the ring, ch1,


sc into the corner of side squares (see picture), ch1,


3dc’s into the ring, ch3,


slst into the 3rd ch from the first ch3 group. You have to trim the loose ends now, after every finished square. (It’s time consuming, but faster than sewing each square separately.)


All together 196 little squares, measuring all together cca 34cm x 34cm (13,5”x 13,5”).
Steam iron it, just be careful if you are using anything else than cotton.

Jeans/denim pillowcase:
For the actual pillowcase I used pair of jeans I bought after my daughter was born. I had them on couple of times, but I got a bit smaller quite soon. However I kept them in the wardrobe as a reminder of my size. It gave me great pleasure to cut them up and use them for something more useful, plus they were just perfectly suitable for this kind of project.
You can really use any kind of suitable fabric, but I used this old/new pair of jeans, because I hope I won’t ever need this size again.

Cut the jeans so it gives you one/front square measuring 41cm x 41cm (16,5”x 16,5”) or the size you would like your pillowcase to be. If you have to sew the bits of jeans together to get the right size, don’t worry, it won’t be visible much since you will sew the crochet square on it.
Pin the crochet square centrally on a right side of your jeans square and sew it on by sewing machine. Steam iron it again if needed (I did).


The back of the pillowcase looks like this. I cut two pieces of jeans (make sure they are nice pieces) measuring 41cm x 25cm (16,5”x 10”). Sew all parts together wrong side up as you can see on the picture. I put three buttons on back of my pillowcase.


You should end up with interesting, little retro, pillowcase. Don’t be scared, if you are not very good in sewing. Personally, I can sew just straight lines and I did it and I like it a lot. The case is not exactly 3D, but it does have very nice texture.


************************************************

Have nice week
Clara

Wednesday, November 19, 2014

Angels room makeover

When I found out our temporary living here is becoming more permanent, that I originally thought, I was very upset and homesick. After while I decided it`ll be better to occupy my mind with something creative. Thanks to my Grandma I always crocheted, knitted and cross stitched, so I started to make our home more homely. With help of my little Angel, I started with dressing up her room into brighter colours.

In one Charity store I found pink Manchester Curtains-150cm x 250cm, 2 pieces, together cost me around £3. I had to buy it.
On first pillowcase I put Union Jack, using ribbons and left over cotton fabric I found at home.
I put hearts on second pillowcase. I found very nice hart shapes in Angels colouring books- just copy it on fabric and saw on pillowcase-using bits of fabric from home supplies.
Third pillowcase was more my cup of my tea, since I’m not master of the needle. Again a Union Jack motive, I bought a crochet pattern I liked from Ravelry.
The pattern for "V-stitch" blanket I found on Sucrette blog and it turned out beautifully. Not exactly my choice of colours, since I’m rather conservative, but my little Angel put them together, the way she likes it. After all who am I? - Her room, her choice.

I was so excited working with that pink fabric, that I sewed curtains under Angels bed from it as well. It provides nice storage space for toys (she’s got to have some special spell to make the toys multiply over night, I don’t understand where we got so many) and it looks different than all the curtains you can buy. I secured them with Velcro, so they can be washed. For the opening we came up with something special. At first I like to put strings of crochet balls or pom-poms there, but I figured out, that wouldn`t be safe or practical enough. On Ravelry I found some squares, adjusted them little bit to my needs, crocheted them together, and now I’m working on it. Originally they should be only pink, but on the picture below, as you can see, I was outvoted again. I'll keep you posted on our progress.


My Angel didn’t like to get rid of her baby chair, so I tried to dress it up little. That pink fabric seems to be endless. The round chair is standard Ikea model - I cover it with crochet circle shape with little flowers.


This picture is little bit “tired” already, but my Dad brought it to me from one of his business trip to Paris, when I was around five years old, just like Angel is now. So it’s got special place in her room.


What to say now? Just thank you Lucy from Attic24 for a fantastic tutorial - "Happy flower decoration".


This picture is from my crosstitching days. We all need some sort of protection sometimes.


After I saw so many beautiful ripple blankets, I had to start one by myself. Yes I’m not that adventurous with colours, but so far I like it.

Thank you for visiting and reading. I like to show you along the way, that there isn’t only Prague or Vienna in this part of the World, but many other interesting places in the countryside, lovely towns and people who are trying to keep up the old traditions even in these busy modern days. I will keep you posted as often as I can.

Bye bye for now. See you soon.
Clara