Translate

Showing posts with label Traditions. Show all posts

Monday, December 24, 2018

Season Greetings

With huge thanks to all of you.


During this festive season of giving, let us take time to slow down and enjoy the simple things. May this wonderful time of the year touch your heart in a special way. Wishing you much joy and happiness not just today, but throughout the New Year.

Saturday, December 31, 2016

Happy New Year

Dear readers,
Thank you for all your visits and comments this year. Thank you for dropping by to share my crochet life, and to all those who bought my patterns throughout the year. Your support means so much to me. Thank you all again.


Every New Year gives you the perfect chance to start something new and fresh. So do your bit this year and make the world a better place for yourself and others.

May God bless you and keep you protected and in good health so that you can witness many more New Years’! But first of all, enjoy this one and stay safe, healthy and happy!

Happy New Year 2017!

With much love to you all

Clara

Tuesday, September 6, 2016

More Lacy Hearts – Free crochet pattern

Hi,
Lately I’m getting more orders for these crochet heart laces, or borders if you like. I made myself one as well. I really do think it’s a very nice decoration so I would like to share it with you again.
I made a very easy, free pattern a while ago and you can find it here:

http://emmhouse21.blogspot.cz/2014/12/christmas-decorations.html


Have a nice week
Clara

Wednesday, December 9, 2015

Vintage Christmas tree and today’s Angels


I would like to present to you this very unique Christmas tree. At first I sewed the original tree (on the picture bellow) in my mum’s neighbours house. The original pattern is unknown, but our lady neighbour made it during World War II as a young girl, and she doesn’t remember how now (she is nearly 90 years old). It’s difficult to say what material she was using then as well – it looks like some kind of cotton. The tree is very dear to her, but she let me take it carefully apart, under her anxious supervision, and write down pattern of my own. It might not be perfectly correct, but it’s as close as I could get without harming the tree.
You can find link to the pattern for crochet Mary and Joseph HERE.


The Christmas tree - pattern


Stitches used:
I’m going to use US terminology here
(slst.)     slip stitch
(ch)       chain
(sc)       single crochet
(dc)       double crochet
(trc)       treble crochet
(sp.)       space  
(betw.)   between
(pr.)       previous row
*  *         repeat


You need: for cca 15cm (6”) high tree
I used cca 30g of green mohair and 5g of silver acrylic yarn of the similar thickness, but any kind of cotton, acrylic or silk will do just fine.
Crochet hook 3.00 mm
Cork 4cm (1,6”) in diameter
Wooden stick cca 15cm (6”) high
5 small green rubber bands
A bit of green acrylic colour and glue
Stars, beads, bubbles, jingle bells or anything else you wish to decorate the tree with

The tree base:
I put together the base for the tree using cork and wooden stick as you can see on the picture. I painted the stick with a little bit of green acrylic color, which I borrowed from my 6-year-old daughter.


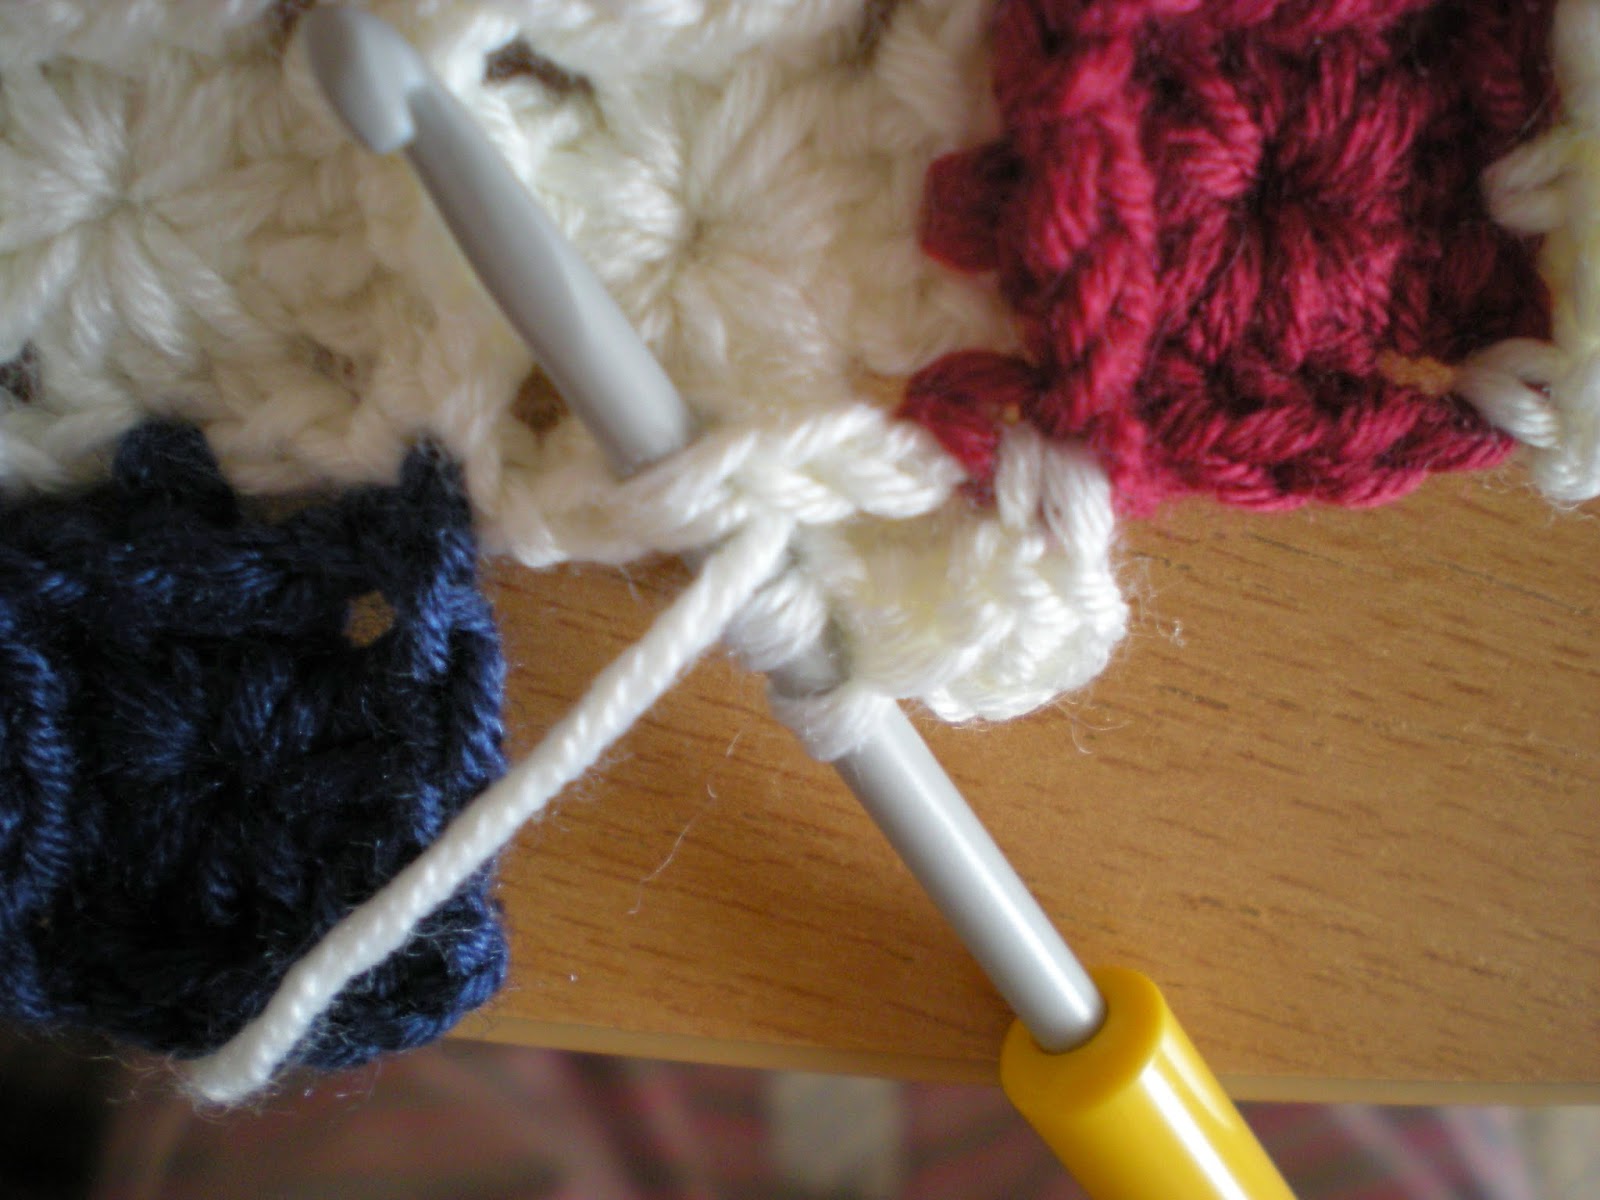
For the tree you need to make five “rings” or circles or layers separately. I worked from bottom layer up. I was using a circular crochet method, ending each round with slst. Do not turn the work at the end.

Bottom layer: 
Green yarn
Round 1: Ch 4. Slst. to form the ring. Ch1, 13 sc’s into the ring, slst. into first ch1. (13sc’s)
Round 2: Ch 5 (counts as dc+ch2), dc in next st., *ch2, dc in next st.* around, ch2, slst. (13dc’s, 13 ch2-sp.)
Round 3: Ch 5 (counts as dc+ch2), dc in same st., *dc – ch2 – dc in next st.* around, slst. 
Round 4: Slst. into next ch2 sp., ch4 (counts as trc) – 2trc - ch1 – 3trc – ch1 in same sp., *3trc - ch1 – 3 trc – ch1 into next ch2 sp.* around, slst.
Round 5: Slst. into next ch1 sp., ch4 (counts as trc)– 2trc - ch1 – 3trc in same sp., *3trc - ch1 – 3 trc into next ch1 sp.* around, slst. Fasten off. Weave in ends.
Change to silver yarn
Round 6: Join silver yarn. Ch 1, sc into same sp., sc into each next st. Fasten off. Weave in ends. Bottom layer is finished.

Another layer:
Green yarn
Round 1: Ch 4. Slst. to form the ring. Ch1, 13 sc’s into the ring, slst. into first ch1. (13sc’s)
Round 2: Ch 5 (counts as dc+ch2), dc in next st., *ch2, dc in next st.* around, ch2, slst. (13dc’s, 13 ch2-sp.)
Round 3: Slst. into next ch2 sp., ch4 (counts as trc) – 2trc - ch1 – 3trc – ch1
in same sp., *3trc - ch1 – 3 trc – ch1 into next ch2 sp.* around, slst.
Round 4: Slst. into next ch1 sp., ch3 (counts as dc) – dc - ch1 – 2dc – ch1
in same sp., *2dc - ch1 – 2dc – ch1 into next ch1 sp.* around, slst.
Change to silver yarn
Round 5: Join silver yarn. Ch 1, sc into same sp., sc into each next st. Fasten
off. Weave in ends. This layer is finished.

Another layer: 
Green yarn
Round 1: Ch 4. Slst. to form the ring. Ch1, 13 sc’s into the ring, slst. into first ch1. (13sc’s)
Round 2: Ch 5 (counts as dc+ch2), dc in next st., *ch2, dc in next st.* around, ch2, slst. (13dc’s, 13 ch2-sp.)
Round 3: Ch 5 (counts as dc+ch2), dc in same st., *dc – ch2 – dc in next st.* around, slst. 
Change to silver yarn
Round 4: Join silver yarn. Ch 1, sc into same sp., sc into each next st. Fasten
off. Weave in ends. This layer is finished.

Another layer:
Green yarn
Round 1: Ch 4. Slst. to form the ring. Ch1, 13 sc’s into the ring, slst. into first ch1. (13sc’s)
Round 2: Ch4 (counts as trc) – 3trc in same sp., *4trc into next st.* around, slst. (39 trc)
Change to silver yarn
Round 3: Join silver yarn. Ch 1, sc into same sp., sc into each next st. Fasten off. Weave in ends. This layer is finished.

Top layer:
Green yarn
Round 1: Ch 4, slst. to form the ring. Ch3 (counts as dc), 24 dc’s into the ring, slst. (25 dc’s)
Change to silver yarn
Round 2: Join silver yarn. Ch 1, sc into same sp., sc into each next st. Fasten off. Weave in ends. Top layer is finished.

Assembling:


You just need to put the layers/branches on top of each other. Start with the largest, finish with the smallest layer. Use the rubber bends to secure the layers in the right place.
Now it’s the time to decorate your tree with stars, beads, bubbles, jingle bells or anything else you wish to.


********************************************************


Felt Angels tutorial


During our recent visit to England I came across beautiful book of DIY felt Christmas toys and decorations and I couldn’t help to create some of my own. The angels won, but I’m planing to do some others.

You need:
I’m sure all you need can be found in most of your homes.
I used felt scraps for the bodies and thicker cotton for the wings
Craft glue, scissors, and cotton stuffing
I used cross-stitch thread (DMC) for whole angel
I used “French knot” for the eyes and “Blanket stitch” to secure the face and to stitch the whole project together (You can find tutorials on “youtube”)

Angel:
I drew an amateur template by hand, from what I could remember.


Adjust the pattern to make the angel the size you need for your project.
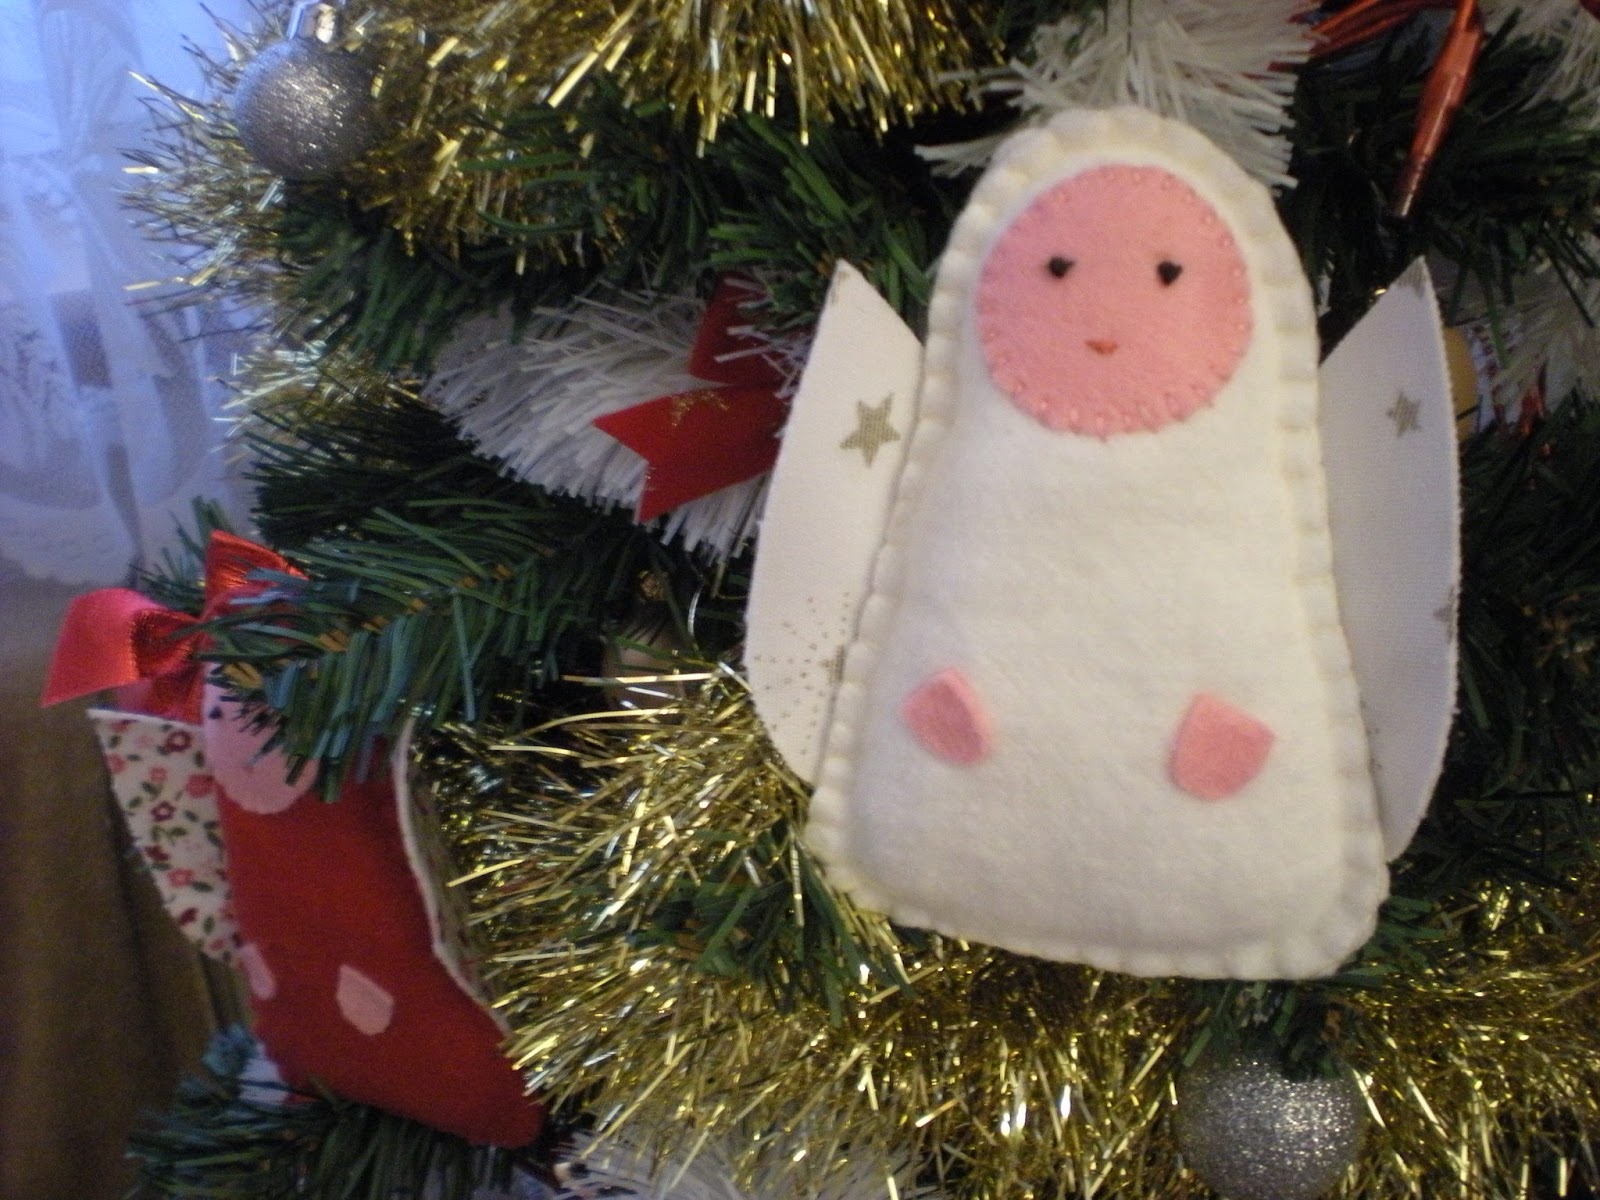
Cut out the template pieces from the paper, pin the paper to the felt and cotton and cut out each piece. You need to cut out one body, one face, two hands and four wings.
At this time I glued two wing pieces, wrong sides together, to make one wing and repeated with the other two, then left them to dry properly on flat surface. You can put some weight on them, so they dry flat.
Pin the face to the top of the body piece. Using skin colored thread, blanket stitch the face to the body. Hand stitch the eyes and mouth. 
Glue the hands to the body and leave it to dry.


Than, pin the two body shapes together. Use “Blanket stitch” to sew around the edge, but leave gap for stuffing. Fill the angel with stuffing. He can be as skinny or as fat as you like. (I suggest you, do not overfill it). Stitch the edges together to finish the angel.
Glue the wings on the backside of the angel.


And there it is. A pretty little angel finished in no time. 

Have nice week
Clara

Monday, August 24, 2015

A trip back in time

During this summer time my little daughter and me (nearly 6 years old now) are making sightseeing trips. This year she “needed” to see how the Kings, Queens and Princesses used to live in castles in old days. Unfortunately England is too far away for one-day trip, but since Czech Republic was an independent part of the Habsburg Monarchy in past, there are plenty of castles in this little country to visit. I picked local Château Buchlovice, which is only 10km/6 miles from where we live.
Besides the tour through the castle, we also visited the flower exhibition in Castle’s Green/Glasshouse. Part of this beautiful garden is used as “Wild life rescue station” for birds of pray, and it’s open to public as a little zoo.
The Château and its surroundings are often used by movie people as a setting to make historical films and fairy tales.


All this nice feelings and sights gave me the inspiration to find and share with you this summer white dress pattern.


The Dress/Cardigan pattern


Size: 40 (M)  You can vary the size of your top by using different types of material and size of hook.
Chest: 50cm (20’’), length (dress): 114mm (45,5’’) (from the shoulder down), sleeve 40cm (16”)


You need: (for this size dress)
650g of 100% cotton (100g-280m) suitable for E/3,5 mm hook
Yarn Needle, marker


Back of the dress:
Ch 100+3, dc into 4th ch from the hook. Follow the chart back and forth for 77 rows (91cm – 36,4”).
In row 1 you should have 25 V’s. 
For the sleeves finish 5 stitches (ch+dc) from each side – in row 78. Following row (79) finish 3 stitches from each side. You should be left with 21 V’s. Follow the chart for 17 more rows (114cm).
Mark the shoulder parts – 5 V’s from each side. 11V’s will be left for neck.


Front of the dress:
Ch 100+3, dc into 4th ch from the hook. Follow the chart back and forth for 77 rows (91cm – 36,4”).
In row 1 you should have 25 V’s. 
For the sleeves finish 5 stitches (ch+dc) from each side – in row 78. Following row (79) finish 3 stitches from each side. You should be left with 21 V’s. Follow the chart for 6 more rows (row 85 – 100cm/40”). 
In row 86 we start to form the neck – don’t crochet the middle 7 V’s. That will divide your work in two parts. You will finish these separately. In next 6 rows finish two motifs. You should be left with 5 motifs on each side. Continue for up to 96 rows (114cm).

Sleeve:
Ch 52+3, dc into 4th ch from the hook. Follow the chart back and forth for 6 rows (7cm – 2,8”). In row 1 you should have 13 V’s. You add 1 stitch in next 4 rows (10 rows = 15motifs). Next 6 rows keep repeating 15 motifs. Add 1 stitch in next 16 rows (32 rows = 23motifs). Next 2 rows keep repeating 23 motifs. All together 34 rows = 40cm/16”.

Assembling: 
Sew together the shoulder pieces – 5V’s each side. Sew the sleeves together first; attach them to the dress afterwards. You can leave the split on one or both sides of the dress as indicated on the picture. Sc around the neck line, sleeves and the bottom with the split/splits.

And there it is. A very noticeable dress, rather simple and quick to do. Pattern can be used to make top/cardigan as well.

Have a nice week
Clara


Sunday, July 26, 2015

A Little Spa holiday

Every summer holiday my little daughter and myself are visiting the Spa Town of Luhacovice for few days. We are very fortunate we are living only half and hours drive away. It’s an amazing little spa town with 15 thousands litrs of mineral water reaching the surface there every day, containing a large amount of dissolved mineral elements, with several natural springs. These are successfully easing people’s problems with bronchitis and asthma. The kids programs especially are very successful here.
So far there are 17 detected sodium hydrocarbonate acidulous springs and one sulphurous spring bubble, containing many dissolved mineral elements, particularly sodium, calcium, magnesium, chlorine, bromine, iodine, carbonic acid, dissolved carbon dioxide. The temperature of the spring water is between 10 - 12 °C. (I was being Google smart here.)
The architecture of the town is very interesting and unique as well, as you will see from the pictures below.
Anyhow the two of us just coming here to have a fun – mainly swimming, taking long walks, trying to taste every spring and playing.


***************************************************************

Just to stay in good mood I made for you a pattern for mandala wheel.


Mandala /coaster chart


You need:
The size of the coaster or mandala really depends on you.
The Pot holder on picture: has a diameter 26cm (10,4”)
The Coaster on picture: has a diameter 18cm (7,2”)
All together I used cca 70g of 100% acrylic yarn suitable for E/3,5mm crochet hook 
Yarn Needle, markers


Circle
Work the mandala or coaster in rounds. Do not turn. Slip stitch on end of each round; use chain stitches on the start of each new round (count as sc or dc). 
Start with magic ring or ch5 – slipstitch into first chain to form a ring.
Follow the chart.

Have a nice week
Clara

Sunday, April 19, 2015

Feeling Patriotic

Hello,
I was thinking for a while about a nice decorative pillowcase. There are so many patterns to choose from, I couldn’t make up my mind. I was thinking about something a little bit patriotic since the royal baby is going to born soon. Than I saw the little squares on Lucy’s blog. I have to admit, I was a bit discouraged by the amount of sewing and tiding up the lose ends I would have to do, but I wanted to make a Union Jack pillowcase using those little squares. So I came up with a different way to put them together. It’s just requiring little bit less needlework.


Union Jack/denim pillowcase pattern

Finished size: 40cm x 40cm (16”x 16”)
Crochet Union Jack flag: 34cm x 34cm (13,5”x 13,5”)

You need: 
I used cca 50 grams of dark red, 50 grams of off white and 50 grams of dark blue cotton
Crochet hook E/3,5mm
Yarn Needle 
A pair of jeans size 14 or bigger or guy’s jeans (preferably not stretchy ones). 
3 buttons

Terms/Abbreviations: I used US terminology
ch       chain 
slst      slip stitch
sc       single crochet
dc       double crochet 
st        stitch 
sk       skip

This is the chart, which I followed. You start in the top left-hand corner, working horizontally.

First square:
Ch4, slst. to 4th ch from the hook (form the ring), ch3, 2dc’s into the ring, ch3, 3dc’s into the ring, ch3, 3dc’s into the ring, ch3, 3dc’s into the ring, ch3, slst into the 3th ch from the first ch3 group.

Connecting the squares:


Ch4, slst. to 4th ch from the hook (form the ring), ch3, 2dc’s into the ring,


ch1, sc into the corner of top squares (see picture), ch1,


dc into the ring, start to do second dc into the ring,


right before you finish the second dc insert the hook into middle dc from top square (see picture),


with the cotton on the top, pull through (you have three loops on the hook),


yo and pull through all three loops, third dc into the ring, ch1,


sc into the corner of top and side squares (see picture), ch1,


dc into the ring, start to do second dc into the ring, right before you finish the second dc insert the hook into middle dc from top square (see picture), with the cotton on the top pull through (you have three loops on the hook), yo and pull through all three loops, 


third dc into the ring, ch1,


sc into the corner of side squares (see picture), ch1,


3dc’s into the ring, ch3,


slst into the 3rd ch from the first ch3 group. You have to trim the loose ends now, after every finished square. (It’s time consuming, but faster than sewing each square separately.)


All together 196 little squares, measuring all together cca 34cm x 34cm (13,5”x 13,5”).
Steam iron it, just be careful if you are using anything else than cotton.

Jeans/denim pillowcase:
For the actual pillowcase I used pair of jeans I bought after my daughter was born. I had them on couple of times, but I got a bit smaller quite soon. However I kept them in the wardrobe as a reminder of my size. It gave me great pleasure to cut them up and use them for something more useful, plus they were just perfectly suitable for this kind of project.
You can really use any kind of suitable fabric, but I used this old/new pair of jeans, because I hope I won’t ever need this size again.

Cut the jeans so it gives you one/front square measuring 41cm x 41cm (16,5”x 16,5”) or the size you would like your pillowcase to be. If you have to sew the bits of jeans together to get the right size, don’t worry, it won’t be visible much since you will sew the crochet square on it.
Pin the crochet square centrally on a right side of your jeans square and sew it on by sewing machine. Steam iron it again if needed (I did).


The back of the pillowcase looks like this. I cut two pieces of jeans (make sure they are nice pieces) measuring 41cm x 25cm (16,5”x 10”). Sew all parts together wrong side up as you can see on the picture. I put three buttons on back of my pillowcase.


You should end up with interesting, little retro, pillowcase. Don’t be scared, if you are not very good in sewing. Personally, I can sew just straight lines and I did it and I like it a lot. The case is not exactly 3D, but it does have very nice texture.


************************************************

Have nice week
Clara